How to Install Boslla 80W LED Headlight Bulbs
As technology continues to advance, more and more drivers are upgrading their vehicles with LED headlight bulbs for their superior brightness and energy efficiency. With their plug-and-play design, LED headlight bulbs are incredibly easy to install, making it a simple DIY task for even the most inexperienced automotive enthusiasts. In this guide, we will walk you through the process of installing Boslla 80W LED headlight bulbs, ensuring a hassle-free and professional upgrade for your vehicle.
Table of Contents
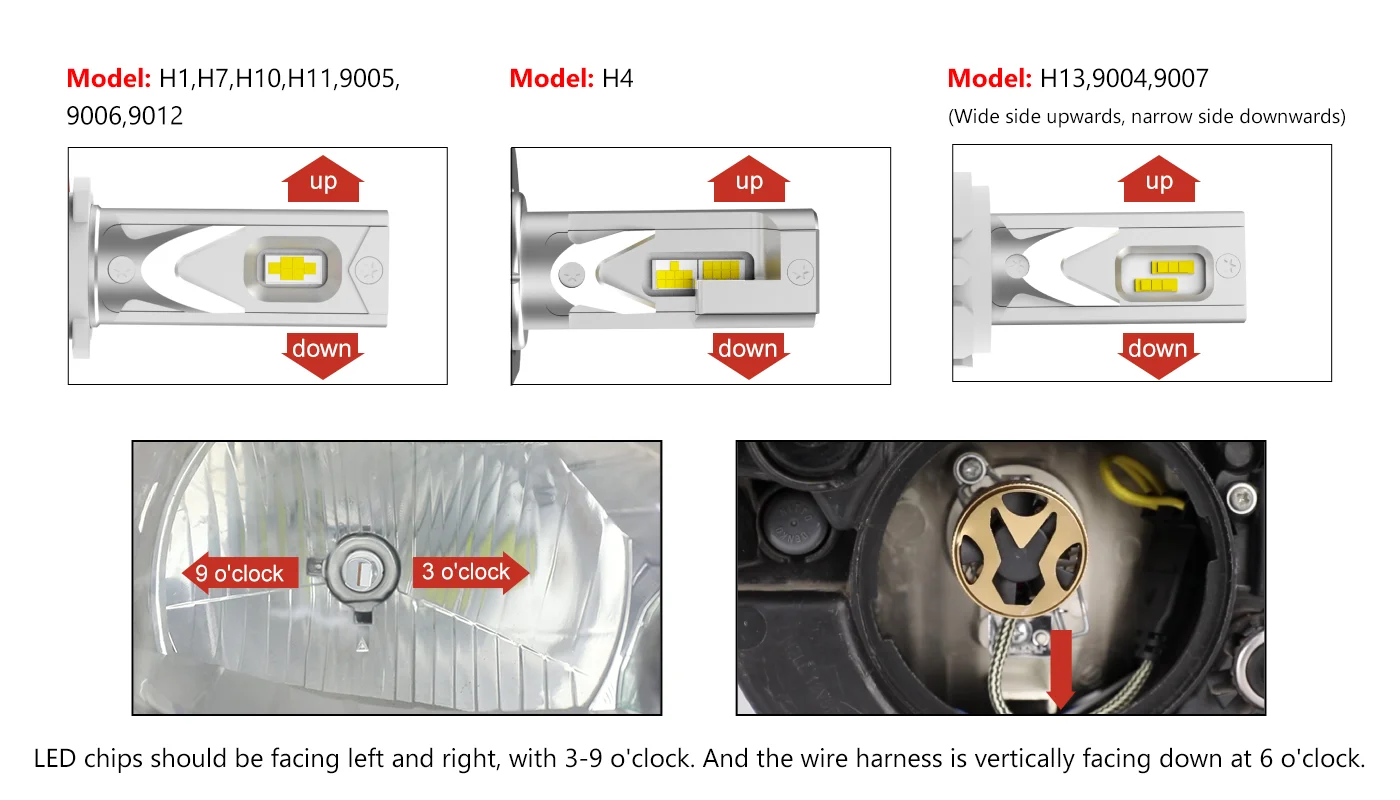
Correct LED Headlight Bulbs Direction
The diodes (LED chips) should always be in a side-to-side orientation, meaning, you should have one set of LEDs facing at 3 o’clock and the other set facing at 9 o’clock. This will allow a nice and even 360° light distribution throughout the housing creating an even beam of light as well as evenly filling up the housing.

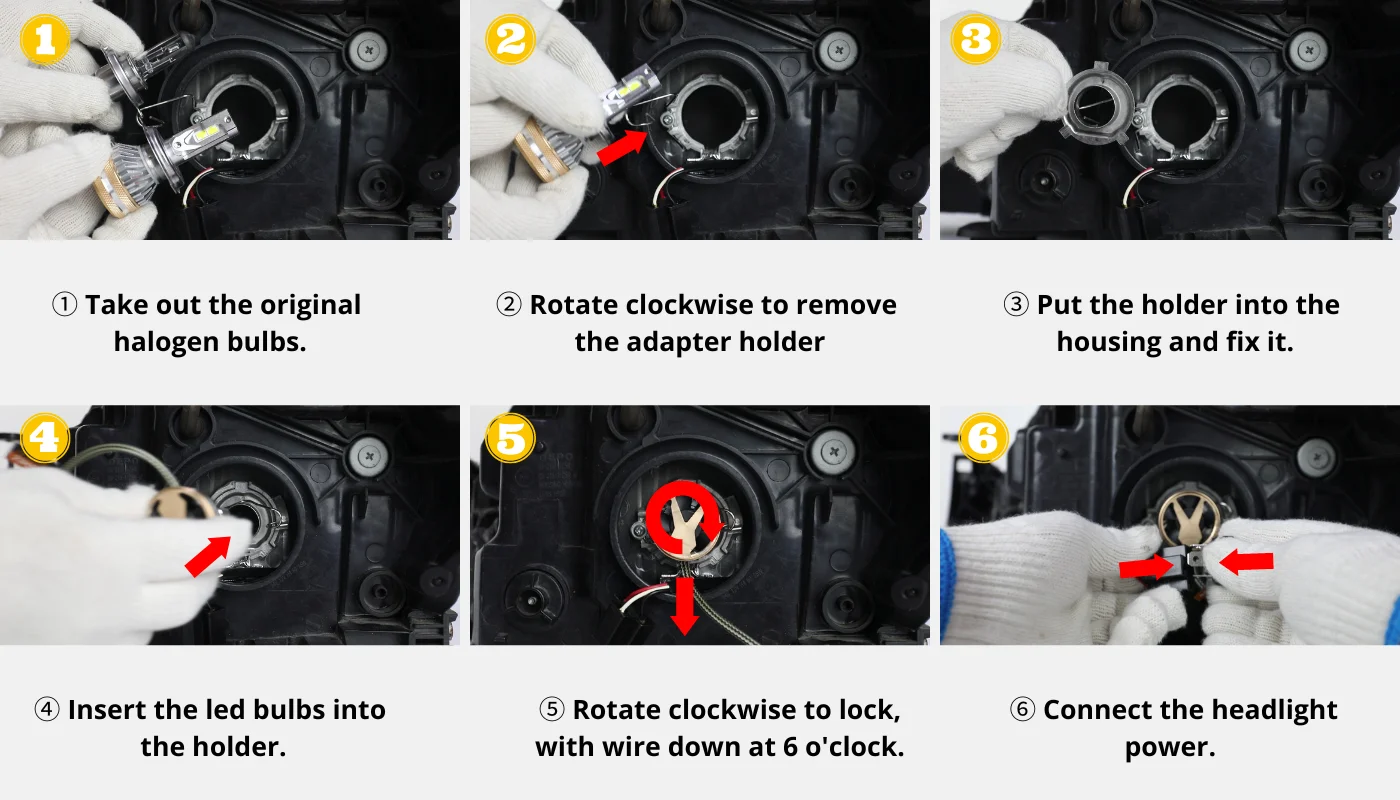
LED Headlight Bulbs Installation Steps
For H1, H3, H4, H7, 9004, 9007 Bulb Size

Step 1: Prepare your vehicle
Before you can install the LED headlight bulbs, it is crucial to ensure that your vehicle is turned off and that the headlights are cold. This will prevent any risk of electric shock or burns during the installation. It is also recommended to disconnect the negative terminal of the car battery to avoid accidental short circuits.
Step 2: Access the headlight assembly
To access the headlight assembly, you may need to remove the grille, bezel, or other components in front of the headlights. Refer to your vehicle’s owner’s manual for specific instructions on how to access the headlight assembly. In most cases, you may need to remove a few screws, clips, or fasteners to gain access.
Step 3: Remove the old headlight bulbs
Once you have accessed the headlight assembly, locate the back of the old headlight bulbs. Depending on the type of connector used, you may need to twist, unplug, or unclip the bulb to remove it. Take note of the orientation of the bulb during removal, as it will help you correctly position the new LED headlight bulbs.
Step 4: Install the new LED headlight bulbs
Take your new LED headlight bulbs and ensure they are compatible with your vehicle’s headlight assembly. Carefully line up the tabs, notches, or pins on the base of the LED bulbs with the corresponding slots or holes in the headlight assembly. Gently push the bulb into the socket and give it a slight twist or push to secure it in place. Ensure that the bulb is firmly seated and properly aligned.
Step 5: Test the headlights
Before reassembling the headlight assembly, it is crucial to test the newly installed LED headlight bulbs. Connect the negative terminal of the car battery (if previously disconnected) and turn on the headlights. Check if both the low and high beams are working correctly, and adjust the headlights if necessary. If the new LED headlight bulbs do not illuminate or perform as expected, double-check the installation and consult the manufacturer’s instructions.
Step 6: Reassemble the headlight assembly
Once you have confirmed that the LED headlight bulbs are working correctly, you can proceed to reassemble the headlight assembly. Follow the reverse order of the disassembly process, making sure to securely fasten any screws, clips, or fasteners. Double-check that everything is properly aligned before finishing the reassembly.
How to Find a Bulb to Fit Your Vehicle
Before we dive into the installation process, it is important to note that LED headlight bulbs come in various sizes, depending on the make and model of your vehicle. It is crucial to identify the correct bulb size to ensure compatibility and a proper fit. This information can be found in your vehicle’s owner’s manual or by checking with Boslla Auto Bulb Finder below.

